Content Menu
● Choosing the Right Materials
● Preparing the Gift Bag
● Lining the Gift Bag
● Wrapping the Gift (Optional)
● Placing the Gift in the Bag
● Creating the Decorative Top
● Arranging the Tissue Paper
● Adding Final Touches
● Tips for Different Occasions
● Troubleshooting Common Issues
● Creative Variations
● Eco-Friendly Alternatives
● Storing Leftover Tissue Paper
● Conclusion
● Related Questions and Answers
>> 1. How many sheets of tissue paper should I use for a gift bag?
>> 2. Can I reuse tissue paper from gift bags I've received?
>> 3. What's the best way to match tissue paper colors with the gift bag?
>> 4. How do I prevent tissue paper from falling out of the gift bag?
>> 5. Are there alternatives to traditional tissue paper for gift bags?
Gift-giving is an art, and presentation plays a crucial role in making your gift memorable. One of the simplest yet most effective ways to elevate the appearance of your gift is by adding tissue paper to a gift bag. This guide will walk you through the process, providing tips and tricks to help you achieve a professional-looking result.

Choosing the Right Materials
Before diving into the process, it's essential to gather the appropriate materials. The two main components you'll need are:
1. Gift Bag: Select a bag that complements your gift in terms of size and style. Consider the occasion and the recipient's preferences when choosing the color and design.
2. Tissue Paper: Opt for high-quality tissue paper that doesn't easily tear or wrinkle. You can choose a single color or mix multiple colors for a more vibrant look.
Preparing the Gift Bag
Before adding tissue paper, ensure your gift bag is ready:
1. Remove any tags or stickers from the bag.
2. Smooth out any creases or wrinkles.
3. If the bag has been folded, reshape it to its proper form.
Lining the Gift Bag
The first step in adding tissue paper to a gift bag is to create a protective lining:
1. Take one or two sheets of tissue paper, depending on the bag's size.
2. Gently crumple the tissue paper to create a soft cushion.
3. Place the crumpled tissue at the bottom of the bag.
4. Add more crumpled tissue along the sides if needed.
This lining serves two purposes: it protects the gift from scratches and adds volume to the bag, making it look fuller.
Wrapping the Gift (Optional)
For fragile items or to add an extra layer of surprise, consider wrapping the gift in tissue paper before placing it in the bag:
1. Lay a sheet of tissue paper flat on a table.
2. Place the gift in the center of the sheet.
3. Fold the edges of the tissue paper over the gift, creating a neat package.
4. Secure with a small piece of tape if necessary.
Placing the Gift in the Bag
Once your gift is ready, it's time to place it in the bag:
1. Gently lower the gift into the center of the bag.
2. If there's excess space, add more crumpled tissue paper around the gift to prevent it from shifting.
Creating the Decorative Top
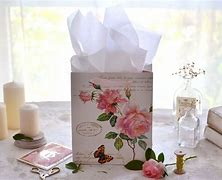
The most visually appealing part of a gift bag is the decorative tissue paper peeking out of the top. Here's how to achieve that professional look:
1. Take a sheet of tissue paper and lay it flat on the table.
2. Pinch the center of the sheet with your thumb and forefinger.
3. Lift the paper, allowing the edges to fall naturally.
4. Twist the pinched portion slightly to create a point.
5. Carefully insert the pointed end into the bag, leaving the fluffy top visible.
6. Repeat this process with additional sheets, using the same or different colors.
For a medium-sized bag, you'll typically need 2-3 sheets for the top. Adjust the number based on the bag's size and your desired fullness.
Arranging the Tissue Paper
After inserting the tissue paper, take a moment to arrange it for the best presentation:
1. Gently fluff the visible portion of the tissue paper.
2. Ensure the tissue is evenly distributed across the top of the bag.
3. If using multiple colors, arrange them so that each color is visible.

Adding Final Touches
To further enhance your gift presentation, consider these additional steps:
1. Ribbon or Bow: Tie a ribbon around the bag's handles or attach a pre-made bow to the front.
2. Gift Tag: Include a personalized gift tag, either tied to the handle or adhered to the bag.
3. Embellishments: Add small decorative elements like artificial flowers, miniature ornaments, or glitter (depending on the occasion).
Tips for Different Occasions
Tailor your tissue paper presentation to suit various events:
- Birthdays: Use bright, festive colors or match the tissue to the recipient's favorite hues.
- Weddings: Opt for elegant whites, silvers, or golds, or choose colors that match the wedding theme.
- Baby Showers: Pastel pinks, blues, or yellows are traditional choices.
- Holidays: Select colors that represent the specific holiday, such as red and green for Christmas or orange and black for Halloween.
Troubleshooting Common Issues
Even with careful preparation, you might encounter some challenges. Here are solutions to common problems:
1. Tissue Paper Tearing: Handle the tissue gently and avoid overstuffing the bag.
2. Uneven Appearance: Take time to adjust and fluff the tissue paper until it looks balanced.
3. Color Bleeding: If using multiple colors, be cautious with tissue paper that may bleed when damp. Keep different colors separated if there's a risk of moisture.
4. Tissue Falling Out: Ensure the pointed ends are inserted deep enough into the bag to secure them in place.
Creative Variations
Once you've mastered the basic technique, try these creative variations:
1. Ombré Effect: Layer tissue papers in graduating shades of the same color.
2. Textured Look: Mix standard tissue paper with crinkled or metallic varieties.
3. Seasonal Themes: Incorporate themed tissue paper, such as snowflake patterns for winter gifts or floral prints for spring.
4. Peek-a-Boo Design: Cut small shapes (like hearts or stars) in the tissue paper before inserting it into the bag for a unique effect.
Eco-Friendly Alternatives
For those concerned about waste, consider these environmentally friendly options:
1. Use recyclable or biodegradable tissue paper.
2. Opt for reusable fabric gift bags with cloth "tissue" that can be used multiple times.
3. Create your own tissue paper from old magazines or newspapers for a unique, upcycled look.
Storing Leftover Tissue Paper
To keep your tissue paper in good condition for future use:
1. Gently smooth out any wrinkles.
2. Stack sheets flat in a drawer or storage box.
3. Keep tissue paper away from direct sunlight to prevent fading.
Conclusion
Adding tissue paper to a gift bag is a simple yet effective way to enhance the presentation of your gift. With a little practice and creativity, you can create stunning gift presentations that will delight your recipients. Remember, the key is to choose complementary colors, handle the tissue paper gently, and take your time arranging it for the best effect. Whether you're preparing a gift for a birthday, wedding, or holiday, mastering this skill will ensure your presents always look polished and thoughtful.

Related Questions and Answers
1. How many sheets of tissue paper should I use for a gift bag?
The number of sheets depends on the size of the bag and the desired fullness. For a medium-sized bag, use 2-3 sheets for lining and 2-3 sheets for the decorative top. Adjust as needed for smaller or larger bags.
2. Can I reuse tissue paper from gift bags I've received?
Yes, you can reuse tissue paper if it's still in good condition. Gently smooth out any wrinkles and store it flat until you need it for another gift.
3. What's the best way to match tissue paper colors with the gift bag?
Choose tissue paper that either matches or complements the gift bag's color. You can also select colors that represent the occasion or the recipient's preferences.
4. How do I prevent tissue paper from falling out of the gift bag?
Ensure that you insert the pointed end of the tissue paper deep enough into the bag. You can also lightly twist the paper to create a more secure hold.
5. Are there alternatives to traditional tissue paper for gift bags?
Yes, you can use fabric, tulle, or even decorative paper shreds as alternatives to traditional tissue paper. These options can add unique textures and styles to your gift presentation.


