Content Menu
● What You Will Need
● Step-by-Step Guide to Gift Wrapping
>> Step 1: Measure and Cut the Wrapping Paper
>> Step 2: Secure One Side of the Paper
>> Step 3: Fold and Tape the Other Side
>> Step 4: Tuck and Fold Ends
>> Step 5: Add Ribbons and Embellishments
● Creative Techniques for Gift Wrapping
>> Use Layering Techniques
>> Incorporate Nature-Inspired Elements
>> Customize Your Gift Wrap with Stamps or Paint
● Tips for Perfect Gift Wrapping
● Common Mistakes to Avoid
● Conclusion
● Related Questions
>> 1. What type of wrapping paper is best for gift wrapping?
>> 2. Can I use fabric instead of traditional wrapping paper?
>> 3. How do I wrap awkwardly shaped gifts?
>> 4. What are some creative ways to decorate wrapped gifts?
>> 5. How do I make my gift wrap eco-friendly?
Gift wrapping is an art form that combines creativity, technique, and a personal touch. Whether it's for a birthday, holiday, or special occasion, wrapping a gift beautifully can enhance the excitement of giving and receiving. This comprehensive guide will walk you through the steps of gift wrapping a box, provide tips for making your gifts stand out, and include visual aids to help you master the craft.

What You Will Need
Before you start wrapping, gather the following materials:
- Wrapping Paper: Choose a design that suits the occasion.
- Scissors: Sharp scissors will help you cut clean edges.
- Tape: Double-sided tape provides a professional look.
- Ribbons or Twine: For decoration and finishing touches.
- Gift Tags: To add a personal message.
- Optional Embellishments: Such as stickers, flowers, or ornaments.
Step-by-Step Guide to Gift Wrapping
Step 1: Measure and Cut the Wrapping Paper
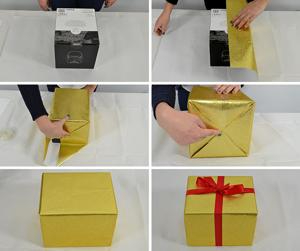
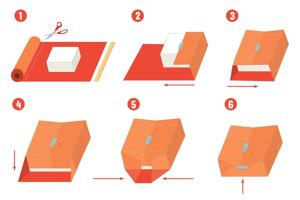
1. Lay the Box Down: Place your box face down on the wrapping paper.
2. Measure the Paper: Roll the paper around the box until it overlaps slightly. Leave about two inches of extra paper on each side for folding.
3. Cut the Paper: Use sharp scissors to cut the paper straight across.
Step 2: Secure One Side of the Paper
1. Center the Box: Position your box in the middle of the cut paper.
2. Fold One Side Over: Bring one side of the wrapping paper over to cover half of the box.
3. Tape It Down: Use tape to secure this side in place.
Step 3: Fold and Tape the Other Side
1. Bring Up the Other Side: Pull up the other side of the wrapping paper.
2. Tuck in Edges: Tuck in any excess paper at the ends for a neat finish.
3. Secure with Tape: Tape this side down securely.
Step 4: Tuck and Fold Ends
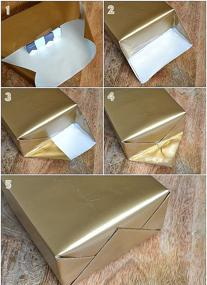
1. Create Flaps on Each End: For each end of the box, push in both sides to create triangular flaps.
2. Fold Down Flaps: Fold down these flaps towards the center of the box.
3. Tape Down: Secure them with tape.
Step 5: Add Ribbons and Embellishments
1. Choose Your Ribbon: Lay a long piece of ribbon underneath your box.
2. Wrap It Around: Cross it over on top and bring it back underneath.
3. Tie a Bow: Flip the box over and tie a bow with the ribbon.
4. Add Gift Tags or Other Decorations: Personalize your gift further by attaching tags or additional decorations.
Creative Techniques for Gift Wrapping
To elevate your gift wrapping skills, consider incorporating some creative techniques that can make your gifts even more special:
Use Layering Techniques
Layering different types of wrapping materials can create depth and interest. For example:
- Start with a base layer of plain kraft paper.
- Add a layer of patterned tissue paper or fabric on top before securing everything with ribbon.
This technique not only adds texture but also allows you to mix colors and patterns creatively.

Incorporate Nature-Inspired Elements
Using natural elements can give your gifts an earthy, rustic feel:
- Attach sprigs of pine, eucalyptus, or dried flowers to your wrapped gift using twine or ribbon.
- Consider using leaves or small branches as part of your decoration for an organic touch.
These elements can be particularly appealing during holidays like Christmas or Thanksgiving.
Customize Your Gift Wrap with Stamps or Paint
If you're feeling artistic, consider customizing your wrapping paper:
- Use stamps to create unique designs on plain wrapping paper.
- Alternatively, use fabric paint to create patterns or messages directly on fabric wraps.
This personal touch makes each gift truly one-of-a-kind.
Tips for Perfect Gift Wrapping
- Use Quality Materials: Thicker wrapping paper is easier to work with and looks more polished.
- Practice Neatness: Take your time to ensure clean folds and edges for a professional appearance.
- Get Creative with Designs: Use patterned paper or embellishments that reflect the recipient's personality or interests.
- Consider Eco-Friendly Options: Use recyclable materials or fabric wraps for an environmentally friendly approach.
Common Mistakes to Avoid
Even seasoned gift wrappers can make mistakes from time to time. Here are some common pitfalls to avoid:
- Cutting Paper Too Short: Always measure twice before cutting! If you're unsure, it's better to have extra paper than not enough.
- Using Too Much Tape: While tape is essential for securing your wrap, using too much can make it look messy. Try to use just enough to hold everything in place neatly.
- Ignoring Folds and Corners: Pay attention to how you fold corners; messy corners can ruin an otherwise beautiful wrap job.
Conclusion
Gift wrapping is not just about covering a present; it's about creating an experience that enhances anticipation and joy. By following these steps and tips, you can transform any ordinary gift into something extraordinary. Remember, practice makes perfect, so don't hesitate to experiment with different techniques and styles!

Related Questions
1. What type of wrapping paper is best for gift wrapping?
A thicker wrapping paper is generally better as it holds its shape well and provides a more polished look.
2. Can I use fabric instead of traditional wrapping paper?
Yes! Fabric can be a beautiful alternative that is reusable and eco-friendly.
3. How do I wrap awkwardly shaped gifts?
For awkward shapes, consider using gift bags or boxes that can be filled with tissue paper for cushioning.
4. What are some creative ways to decorate wrapped gifts?
You can use natural elements like twine, dried flowers, or even handmade ornaments to add a unique touch.
5. How do I make my gift wrap eco-friendly?
Use recyclable materials like brown kraft paper, fabric wraps, or biodegradable ribbons to minimize environmental impact.


