Content Menu
● Choosing the Right Materials
● Basic Bow-Making Techniques
>> Step-by-Step Instructions
● Advanced Bow Techniques
>> Tiffany Style Bow
>> Double-Layered Bow
● Tips for Perfect Bows
● Wrapping It All Up
● Conclusion
● Related Questions
>> 1. What types of ribbons are best for making bows?
>> 2. How long should my ribbon be?
>> 3. Can I use multiple ribbons?
>> 4. What should I do if my bow looks flat?
>> 5. How can I store my ribbons?
Creating a beautiful bow for a gift box can elevate your present, making it not only more visually appealing but also adding a personal touch. Whether you're preparing for a birthday, holiday, or any special occasion, mastering the art of bow-making is a valuable skill. This comprehensive guide will walk you through the steps to create various types of bows, tips for selecting materials, and additional techniques to enhance your gift-wrapping skills.

Choosing the Right Materials
Before diving into the bow-making process, it's essential to gather the right materials. The choice of ribbon can significantly impact the final look of your bow. Here are some options to consider:
Types of Ribbon:
- Satin Ribbon: Offers a smooth and shiny finish, ideal for elegant gifts.
- Wired Ribbon: Provides structure and allows you to shape the bow easily. This type is perfect for larger bows or when you want to create dramatic effects.
- Burlap Ribbon: Gives a rustic and natural look, suitable for casual or outdoor-themed gifts.
- Paper Ribbon: A unique option that can be crafted into bows and is often more eco-friendly.
When selecting ribbon, consider the width and length. A wider ribbon typically creates fuller bows, while longer lengths allow for more elaborate designs.
Basic Bow-Making Techniques
Now that you have your materials ready, let's explore how to make a simple yet elegant bow.
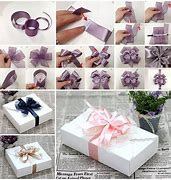
Step-by-Step Instructions
1. Measure Your Ribbon:
- For most gift boxes, cut a length of ribbon between 36 to 48 inches. This length will vary based on the size of your box and how large you want your bow.
2. Create the Base:
- Place the gift box in the center of your ribbon strip.
- Bring the ends of the ribbon together at the top of the box and tie a simple knot. This will serve as the base for your bow.
3. Forming Loops:
- With one end of the ribbon, create a loop by bringing it back towards the center.
- Hold this loop with one hand while using your other hand to create another loop with the opposite end of the ribbon.
- Continue creating loops on each side until you reach your desired fullness. Typically, four loops on each side work well for most bows.
4. Secure the Bow:
- Once you have formed your loops, hold them tightly in place and use a separate piece of ribbon (about 12 inches long) to tie around the center of your loops.
- Make sure to pull this tie snugly but not too tight; you want to maintain the shape of your loops.
5. Fluffing Your Bow:
- After securing the center, gently pull on each loop to fluff them out. This step is crucial as it gives your bow its final shape and volume.
6. Trimming Ends:
- To finish off your bow, trim the ends of the ribbon at an angle or in a "V" shape for a polished look.

Advanced Bow Techniques
Once you're comfortable with making basic bows, you can experiment with more advanced techniques to create unique styles.
Tiffany Style Bow
The Tiffany bow is characterized by its flat bottom and elegant top bow. Here's how to create it:
1. Prepare Two Ribbons:
- Use one long piece of ribbon (for wrapping around) and another for making loops.
2. Wrap Around:
- Start by wrapping the long piece around the box horizontally and vertically, ensuring it lays flat against the surface.
3. Create Loops:
- Follow similar steps as before to create loops with your second piece of ribbon.
4. Finish with Tails:
- Allow longer tails on both sides for an elegant finish.
Double-Layered Bow
For an extra touch of sophistication:
1. Use Two Ribbons:
- Select two different ribbons (a wider one for volume and a narrower one for contrast).
2. Layering Technique:
- Create loops with both ribbons simultaneously, ensuring they are aligned properly as you tie them together at the center.
3. Fluff Each Layer:
- Fluff each layer separately to showcase both ribbons' colors and textures.
Tips for Perfect Bows
- Quality Matters: Invest in good-quality ribbon that won't fray easily when cut.
- Practice Makes Perfect: Don't be discouraged if your first few attempts aren't perfect; practice will improve your skills.
- Use Sharp Scissors: Ensure clean cuts on your ribbon ends to enhance their appearance.
- Experiment with Sizes: Adjust loop sizes according to personal preference or gift size; larger gifts can handle bigger bows.
Wrapping It All Up
Creating beautiful bows is not just about aesthetics; it adds a personal touch that shows care and effort in gift-giving. With practice and creativity, anyone can master this skill. Remember that each bow you make can reflect your personality and style—so have fun with it!
Conclusion
In conclusion, making a bow for a gift box is an enjoyable craft that enhances any present's appeal. By selecting quality materials and practicing various techniques, you can create stunning bows that impress recipients while showcasing your creativity.

Related Questions
1. What types of ribbons are best for making bows?
The best types include satin for elegance, wired for structure, burlap for rustic themes, and paper ribbons for eco-friendliness.
2. How long should my ribbon be?
A length between 36 to 48 inches is generally sufficient for most gift boxes but adjust based on size preferences.
3. Can I use multiple ribbons?
Yes! Combining different ribbons can create unique textures and colors in your bows.
4. What should I do if my bow looks flat?
Fluffing each loop after securing them will help give your bow volume; gently pull on each loop to achieve this effect.
5. How can I store my ribbons?
Store ribbons in a cool, dry place away from direct sunlight to prevent fading or damage; consider using containers that keep them organized.


