Content Menu
● Materials Needed
● Basic Paper Bag Design
>> Step 1: Choose Your Paper Size
>> Step 2: Cut the Paper
>> Step 3: Fold the Paper
>> Step 4: Create the Bottom
>> Step 5: Assemble the Bag
>> Step 6: Add Handles (Optional)
● Creative Variations
>> Decorative Paper Bags
>> Reusable Shopping Bags
>> Gift Bags with Tags
● Benefits of Using Paper Bags
● Conclusion
● Related Questions
>> 1. What types of paper are best for making bags?
>> 2. Can I make waterproof paper bags?
>> 3. How can I decorate my paper bags?
>> 4. Are homemade paper bags sturdy enough for groceries?
>> 5. How do I store my homemade paper bags?
Making paper bags is a practical and eco-friendly craft that not only helps reduce plastic waste but also allows you to express your creativity. In this article, we will explore the various methods of creating paper bags, the materials needed, and the benefits of using paper bags over plastic ones. Whether you are looking to create simple bags for gifts or more elaborate designs for shopping, this guide will provide you with all the information you need.

Materials Needed
Before diving into the process of making paper bags, it is essential to gather all the necessary materials. Here's a list of items you will need:
- Paper: You can use various types of paper, including kraft paper, recycled paper, or decorative paper. The choice of paper will depend on the purpose of your bag.
- Scissors: A good pair of scissors is crucial for cutting the paper to the desired size and shape.
- Glue or Tape: Adhesives are necessary for securing the sides and bottom of the bag. You can use craft glue, double-sided tape, or even a glue stick.
- Ruler: A ruler helps ensure that your measurements are accurate when cutting and folding.
- Pencil: Use a pencil to mark measurements on your paper before cutting.
- Optional Decorations: If you want to personalize your bags, consider adding stamps, stickers, or drawings.
Basic Paper Bag Design
To start making a basic paper bag, follow these simple steps:
Step 1: Choose Your Paper Size
Decide on the dimensions of your bag. A standard size for a small gift bag is about 10 inches tall by 6 inches wide. For larger bags, you might want to increase these dimensions accordingly.
Step 2: Cut the Paper
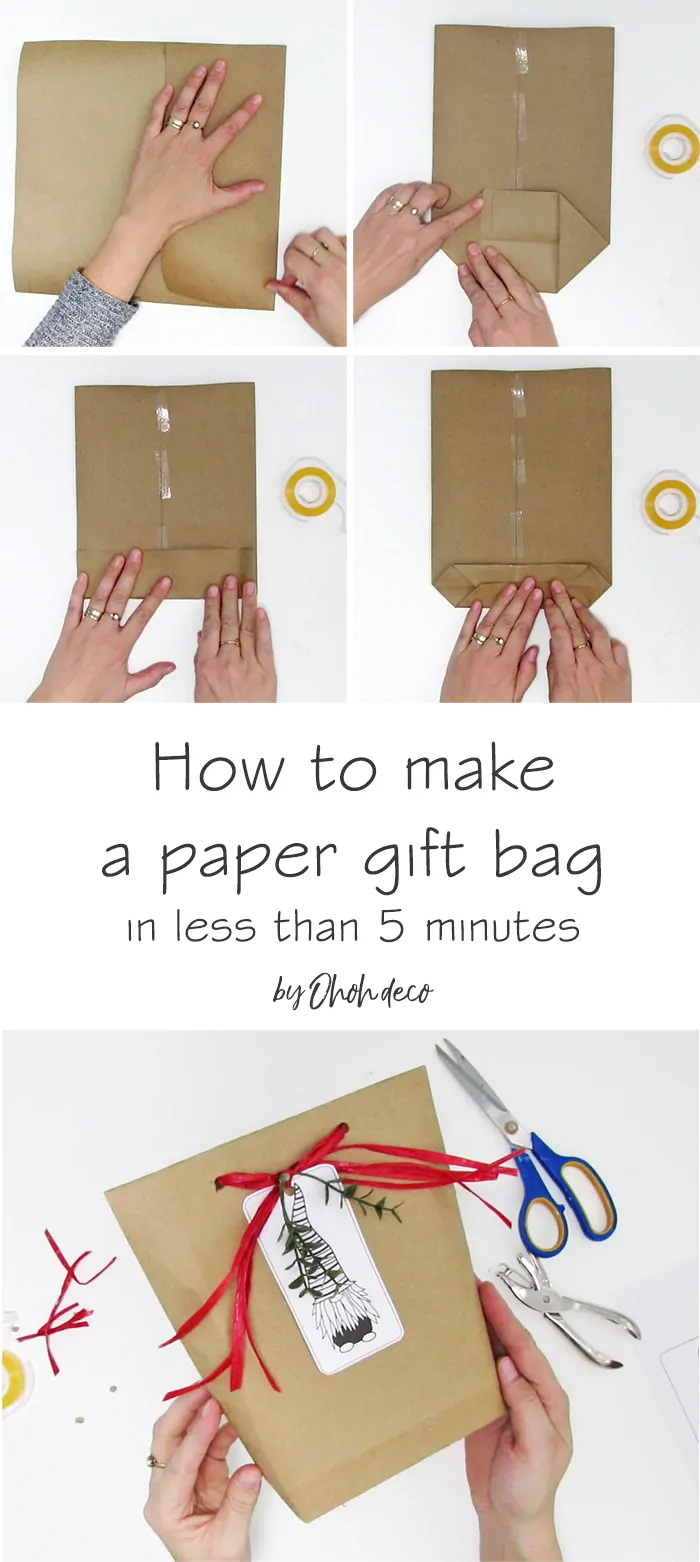
Using your ruler and scissors, cut a rectangle from your chosen paper based on the dimensions you decided in Step 1. For a standard small bag, cut a piece that measures 12 inches by 15 inches. This extra length will allow for folds at the bottom.
Step 3: Fold the Paper
To create the bag shape:
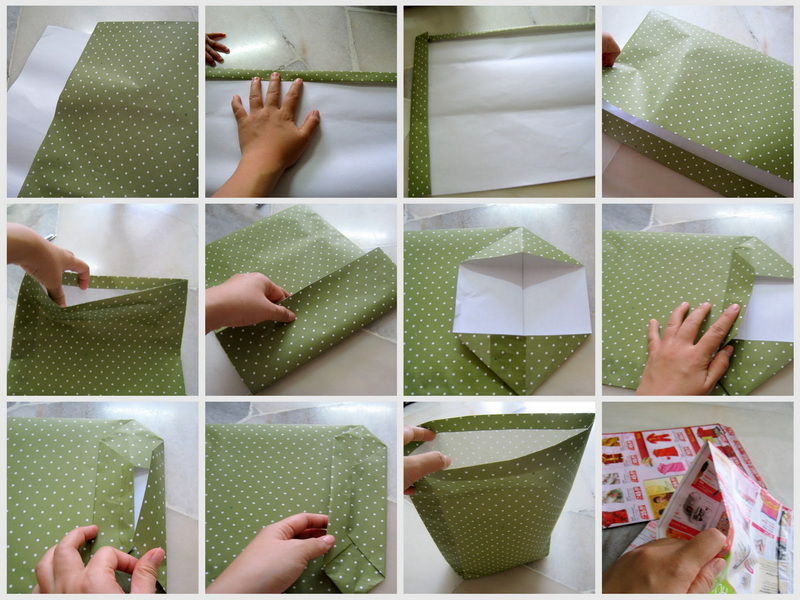
1. Fold the rectangle in half lengthwise (the longer side), ensuring that the edges align perfectly.
2. Unfold it to reveal a center crease.
3. Fold each side towards the center crease to create three equal sections.
4. Fold up about 2 inches from the bottom edge to form the base of the bag.
Step 4: Create the Bottom
Now that you have folded up the bottom:
1. Open up this folded section and flatten it out to form a triangle on each side.
2. Fold these triangles inward towards each other and secure them with glue or tape.
Step 5: Assemble the Bag
Once your bottom is secure:
1. Fold up the sides of your bag along the creases you made earlier.
2. Use glue or tape to secure these edges together.
3. Make sure everything aligns properly for a neat finish.
Step 6: Add Handles (Optional)
If you want to add handles:
1. Cut two strips of paper about 1 inch wide and 12 inches long.
2. Attach one end of each strip inside the top edge of your bag using glue or tape.
3. Ensure they are evenly spaced for balance.

Creative Variations
Once you've mastered the basic design, consider trying some creative variations:
Decorative Paper Bags
Use patterned or colored paper to create decorative bags suitable for gifts or special occasions. You can also embellish plain bags with stamps, stickers, or drawings.
Reusable Shopping Bags
Make larger bags from sturdy kraft paper that can be reused for shopping trips. Reinforce them by using thicker paper and adding sturdy handles.
Gift Bags with Tags
Create personalized gift bags by adding tags made from leftover paper scraps. Write messages or names on these tags for a personal touch.
Benefits of Using Paper Bags
There are several advantages to using paper bags over plastic ones:
- Eco-Friendly: Paper bags are biodegradable and recyclable, making them a better choice for the environment.
- Customizable: You can easily decorate and personalize paper bags for any occasion.
- Durable: When made from quality materials, paper bags can be quite sturdy and hold significant weight.
- Aesthetic Appeal: Many people find paper bags more visually appealing than plastic ones.
Conclusion
Making paper bags is an enjoyable and rewarding craft that contributes positively to environmental sustainability. With just a few materials and some creativity, you can create beautiful and functional bags for various uses. Whether you choose to make simple gift bags or elaborate shopping totes, this skill not only reduces reliance on plastic but also allows for personal expression through design.
By following this guide, you can start making your own paper bags today! Remember that practice makes perfect; don't hesitate to experiment with different designs and techniques as you become more comfortable with this craft.

Related Questions
1. What types of paper are best for making bags?
Kraft paper is often preferred due to its strength and durability, but recycled paper and decorative papers can also be used depending on your needs.
2. Can I make waterproof paper bags?
While standard paper is not waterproof, you can apply a waterproof sealant or use waxed paper to make water-resistant bags.
3. How can I decorate my paper bags?
You can use stamps, stickers, markers, or paint to personalize your bags creatively.
4. Are homemade paper bags sturdy enough for groceries?
Yes! If made from thick kraft paper and reinforced properly at the seams, they can hold groceries effectively.
5. How do I store my homemade paper bags?
Store them in a cool dry place away from moisture to maintain their shape and quality until needed.


