Content Menu
● Introduction
● Choosing the Right Materials
>> Selecting the Perfect Gift Bag
>> Picking the Ideal Tissue Paper
● Basic Technique: The Classic Poof
>> Prepare Your Workspace
>> Cushion the Bottom
>> Wrap the Gift (Optional)
>> Position the Gift
>> Create the Poof
>> Repeat and Fluff
● Advanced Techniques
>> The Two-Tone Technique
>> The Layered Look
>> The Ruffled Edge
● Tips for Specific Gift Types
>> For Clothing and Soft Items
>> For Fragile Items
>> For Oddly Shaped Gifts
● Seasonal and Themed Variations
>> Holiday Sparkle
>> Spring Freshness
>> Elegant Affairs
● Eco-Friendly Alternatives
● Troubleshooting Common Issues
>> Wrinkled Tissue Paper
>> Overstuffed Bags
>> Understuffed Bags
● The Finishing Touch
● Conclusion
● Frequently Asked Questions
>> 1. How many sheets of tissue paper should I use for a standard gift bag?
>> 2. Can I reuse tissue paper from gifts I've received?
>> 3. How can I make tissue paper last longer in humid conditions?
>> 4. Is it necessary to match the tissue paper color to the gift bag?
>> 5. How can I incorporate tissue paper into gift wrapping for oddly shaped items that don't fit in bags?
Introduction
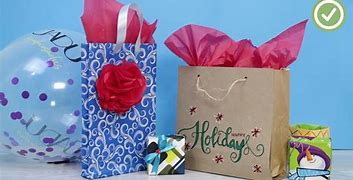
Gift-giving is an art, and presentation plays a crucial role in making your gift memorable. One of the simplest yet most effective ways to elevate your gift presentation is by using tissue paper in a gift bag. This technique not only adds a touch of elegance but also creates an element of surprise and anticipation for the recipient. In this comprehensive guide, we'll explore the art of putting tissue paper in a gift bag, covering everything from selecting the right materials to advanced techniques for creating stunning presentations.

Choosing the Right Materials
Selecting the Perfect Gift Bag
The foundation of a great gift presentation starts with choosing the right gift bag. Consider the following factors:
- Size: The bag should be 2 to 3 times larger than your gift to allow room for tissue paper.
- Style: Choose a bag that complements the occasion and the recipient's taste.
- Durability: For heavier gifts, opt for bags with reinforced bottoms.
- Design: Select from solid colors, patterns, or themed designs to match the event or recipient's preferences.
Picking the Ideal Tissue Paper
Tissue paper comes in a variety of colors, patterns, and finishes. Here's what to consider:
- Color coordination: Match or contrast with the gift bag color.
- Quantity: Have enough sheets for cushioning and decorative purposes.
- Quality: Choose crisp, unwrinkled tissue paper for the best presentation.
- Special finishes: Consider metallic or printed tissue paper for added flair.
Basic Technique: The Classic Poof
Prepare Your Workspace
Clear a flat surface and gather your materials: gift bag, tissue paper, and the gift itself.
Cushion the Bottom
Line the bottom of the bag with 1-2 sheets of crumpled tissue paper. This creates a soft base for your gift and helps it sit at the right height in the bag.
Wrap the Gift (Optional)
For fragile items or to add an extra layer of surprise, consider wrapping the gift in tissue paper before placing it in the bag.
Position the Gift
Place the gift in the center of the bag, nestled on top of the cushioning tissue paper.
Create the Poof
This is the key step in achieving that professional look:
1. Take a sheet of tissue paper and lay it flat.
2. Pinch the center of the sheet with your thumb and forefinger.
3. Lift the paper, allowing the edges to fall naturally.
4. Gently twist the pinched portion to create a slight spiral effect.
5. Insert the twisted end into the bag, leaving the fluffy top visible.

Repeat and Fluff
Add more sheets using the same technique until you achieve the desired fullness. Gently fluff the visible tissue paper to create an even, attractive appearance.
Advanced Techniques
The Two-Tone Technique
Create a more dynamic look by using two complementary colors of tissue paper:
1. Layer two different colored sheets together.
2. Pinch and twist as in the classic technique.
3. Insert into the bag, ensuring both colors are visible.
4. Repeat with additional pairs of sheets until you achieve the desired effect.
The Layered Look
For a more structured appearance:
1. Cut tissue paper sheets into progressively smaller squares.
2. Layer them largest to smallest.
3. Pinch the center and twist slightly.
4. Insert into the bag, allowing the layers to create a tiered effect.
The Ruffled Edge
To add texture and interest:
1. Fold a sheet of tissue paper accordion-style.
2. Use scissors to create a scalloped or fringed edge along the folded side.
3. Unfold and use as you would in the classic technique.
Tips for Specific Gift Types
For Clothing and Soft Items
Use tissue paper to create volume and prevent the bag from looking deflated:
1. Wrap the item in a sheet of tissue paper.
2. Use additional sheets to fill empty spaces in the bag.
3. Create a full poof at the top to maintain the bag's shape.
For Fragile Items
Prioritize protection while maintaining aesthetics:
1. Wrap the item in multiple layers of tissue paper for cushioning.
2. Use crumpled tissue paper to create a protective nest in the bag.
3. Add decorative poofs at the top, but ensure they don't put pressure on the item.
For Oddly Shaped Gifts
Create a uniform appearance:
1. Use tissue paper to build up areas around the gift, creating a more regular shape.
2. Wrap the entire gift in tissue paper to smooth out irregular contours.
3. Fill the bag with enough tissue to maintain its shape and hide the gift's outline.
Seasonal and Themed Variations
Holiday Sparkle
For Christmas or New Year's gifts:
1. Use metallic or glitter-infused tissue paper.
2. Incorporate traditional holiday colors like red, green, gold, or silver.
3. Add small ornaments or tinsel strands among the tissue paper poofs.
Spring Freshness
For Easter or spring-themed gifts:
1. Choose pastel-colored tissue papers.
2. Create tissue paper flowers to nestle among the poofs.
3. Incorporate nature-inspired prints like floral or leaf patterns.
Elegant Affairs
For weddings or formal events:
1. Stick to classic white or ivory tissue paper.
2. Add a touch of metallic tissue for subtle glamour.
3. Incorporate satin ribbons or bows for a refined finish.
Eco-Friendly Alternatives
As we become more environmentally conscious, consider these sustainable options:
1. Use recycled or biodegradable tissue paper.
2. Repurpose colorful pages from old magazines or newspapers.
3. Utilize fabric scraps or remnants for a reusable alternative to tissue paper.
Troubleshooting Common Issues
Wrinkled Tissue Paper
To salvage wrinkled tissue paper:
1. Gently iron on low heat between two sheets of plain paper.
2. Alternatively, lightly steam the tissue paper to relax the fibers.
Overstuffed Bags
If you've added too much tissue:
1. Remove excess sheets one at a time until the balance is right.
2. Rearrange the remaining tissue for an even distribution.
Understuffed Bags
For bags that look deflated:
1. Add more tissue paper to the bottom and sides of the bag.
2. Create fuller poofs at the top by using larger sheets or more layers.
The Finishing Touch
To complete your gift presentation:
1. Add a coordinating ribbon or bow to the bag handles.
2. Attach a personalized gift tag or card.
3. Consider adding a small, themed ornament or charm for extra flair.
Conclusion
Mastering the art of putting tissue paper in a gift bag is a simple yet effective way to elevate your gift-giving experience. By following these techniques and tips, you can create beautiful, professional-looking presentations that will delight your recipients. Remember, the key is to balance aesthetics with practicality, ensuring that your gift is both protected and beautifully presented. With practice, you'll develop your own style and flair, making each gift you give a true reflection of your thoughtfulness and creativity.

Frequently Asked Questions
1. How many sheets of tissue paper should I use for a standard gift bag?
For a medium-sized gift bag, typically 2-3 sheets for cushioning and 2-3 sheets for the decorative poof are sufficient. However, adjust based on the bag size and desired fullness.
2. Can I reuse tissue paper from gifts I've received?
Yes, gently used tissue paper can be reused. Carefully smooth out wrinkles and store flat to maintain its quality for future use.
3. How can I make tissue paper last longer in humid conditions?
Store tissue paper in a cool, dry place. Consider using a dehumidifier in your storage area or placing silica gel packets with your tissue paper to absorb excess moisture.
4. Is it necessary to match the tissue paper color to the gift bag?
While matching can create a cohesive look, contrasting colors or complementary patterns can add visual interest. Experiment with different combinations to find what works best for your presentation.
5. How can I incorporate tissue paper into gift wrapping for oddly shaped items that don't fit in bags?
For irregularly shaped gifts, use tissue paper to create a smooth outer layer before wrapping with traditional gift wrap. This helps achieve a neater appearance and can add an extra element of surprise when unwrapping.


